So, how exactly you make video from photos? Well, it’s very easy thing! Windows Movie Maker is a video editing tool that has been around for quite some time. It ships along with Windows operating system and could be found under Start > Programs > Accessories > Entertainment menu.
A set of photos Music file (if you need music) Windows Movie Maker
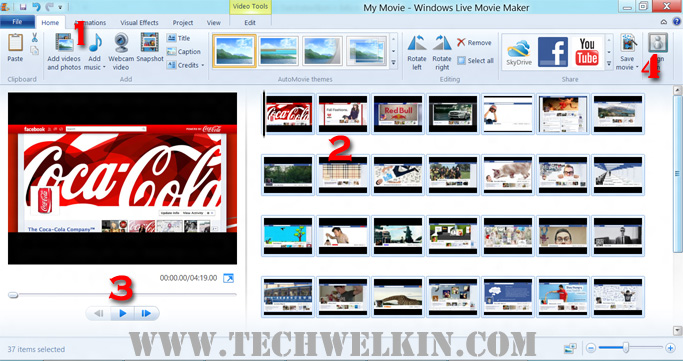
- Launch Windows Movie Maker.
- Now click “Add videos and photos” button given in the toolbar (See marker 1 in image given below). Select the photos that you want to include in your video. Added photos shall appear in the right hand side pane (marker 2). Windows Movie Maker will give some default play length to each photo. You can play and preview your video just after adding photos (marker 3). But most likely, you would want to change duration for each photo’s appearance, add transition effects and add audio track. All these options are readily available. You would just need to play around and synchronize music, transition and length. Once that it done, you can add title slide(s) in the beginning or in the middle. You can add a credits slide at the start or end of the video. Once you have prepared and previewed your video; you can save it in various formats (marker 4). Do that and upload it to the world famous YouTube service. On YouTube, you can even monetize your video to make some money from your videos. Preparing video from photos, music and text is really a fun activity and it tests your creative talent as well. Wasn’t it easy and fun to convert photos into a video? Please let me know if you have any questions. Thank you for using TechWelkin. Comment * Name * Email * Website
Δ